[av_textblock size=” font_color=” color=” admin_preview_bg=”]
Coffee Filter Flowers
By Captain Allison Struck
Anaheim, CA Corps – California South Division
Theme: Love
These coffee filter flowers are inexpensive, require no special equipment and are easy to make.
Talking Points:
And the one sitting on the throne said, “Look, I am making everything new!” And then he said to me, “Write this down, for what I tell you is trustworthy and true.” Revelation 21:5
- We tend to look at ourselves in rather unflattering ways- seeing maybe how plain we are, how little we feel we have to offer.
- God loves us too much to leave us the way we are. We have a God that doesn’t see us how we are, but rather how we can be. Through Jesus, we can be made new.
- When we submit to His process of improvement (with prayer, Scripture, fellowship with other believers), God turns us into something useful and beautiful.
- Alternate/Addition: We are much better together than we are alone- combining our skills, talents, experiences to make something beautiful that becomes the body of Christ.
Supplies Needed:
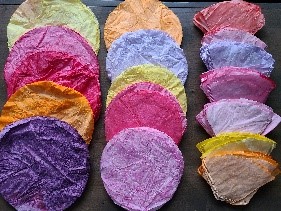
- Round or Cone Coffee Filters (various sizes)- You’ll want about 75 dyed filters per person
- Food Coloring or Acrylic Paint in a variety of colors
- Bamboo Skewers or Green Wood Floral Stems (about 15 per person)
- Masking Tape (or green floral tape)
- Hot glue gun and lots of glue sticks
- Aluminum tins for dyeing
- Vase or mason jar
- Fake leaves (optional)
- Potting soil (optional)
INSTRUCTIONS
Part One – Preparation
**If doing this as a group class, it will either need to be a two-session class, or you’ll need to dye the coffee filters ahead of time. It takes about 48 hours for the coffee filters to dry completely after dyeing).
Step 1: Mix food coloring or acrylic paint with water in aluminum tin. Dip filters into dye for about 30-40 seconds. **Keeping them in longer doesn’t increase the color. If you want to deepen the color, add more paint or food coloring to your water.
a. It is fun to play around with the dye- try doing some just with the tips, some from the base up, dipping some tips in another color, etc.
b. Make sure the entire stack gets wet so it is dyed- but there will be a variety of shades- this adds to each flower being unique when assembled.
c. Flowers will dry much lighter than they appear when wet.
d. Stacks of about 20-25 are best for dyeing at one time.
Step 2: You can place flowers on parchment on a cookie sheet and place in a 250-degree oven for about 60 minutes to aid drying, but they will still need at least 24 hours to dry. If not placing in the oven, allow at least 48 hours to dry completely.
Part Two – Assembly
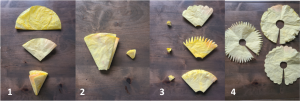
1. Take 3-4 filters and keep stacked together. Fold in half, then in half again, then in half again.
2. While folded, cut a semi-circle into the bottom of the filters, keeping the part that is cut off for later (STEP TWO).
3. Unfold once, and cut a variety of shapes into the top of the filters, to make a variety of “flowers” when assembled.
4. Unfold the flowers (but leave in stacks of 3-4) and cut down the center.
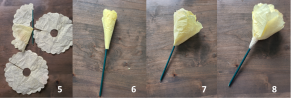
5. Separate layers and glue one layer to a wooden skewer, leaving about three-quarters of the filter above the skewer.
6. Roll, one layer at a time, around the skewer, trying to keep the bottom of the filter as level as possible as you roll. Use the glue gun to glue the layer down. Repeat for each layer, using the hot glue to hold each layer to the previous layer.
****Your first few flowers will be a little rough- it just takes a tiny bit of practice to get the hang of it.
7. Flower will be a little bulky.
8. Use masking tape (or floral tape) to secure the bottom of the flower to the skewer.
****Floral tape is tricky to use, and can be really sticky. The masking tape is easier to use, and most-likely won’t be seen when the flowers are complete and in a vase, on a wall, on a wreath, etc.
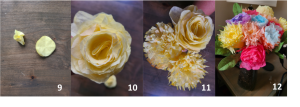
9. Take the small piece cut off in Step Two, push it together to form the inner “bud”.
10. Drop a little hot glue into the middle of the flower (where you can see the skewer, and drop the “bud” down and press gently. This is optional, and you may not need this step if the flower is full enough to cover the skewer.
11. These are what the flowers should look like (top-view) when they are complete. They look much better together as a group, than with just one or two.
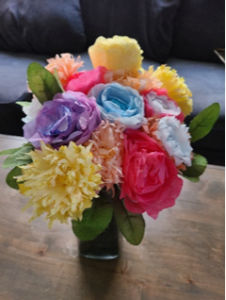
12. Assemble flowers in a mason jar, vase or basket. If desired, add fake leaves and dirt.
Download the PRINTABLE VERSION of this craft.
Note: Also on our website is WARPED LOVE Bible study and GOD’S LOVE devotional that coordinates with this craft.
[/av_textblock]
 Red Letters of Love