By Captain Jan Pemberton
Divisional Women’s Ministries Secretary – Cascade Division
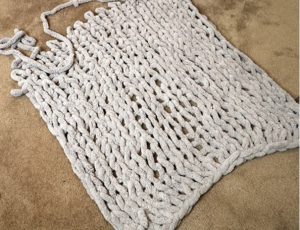
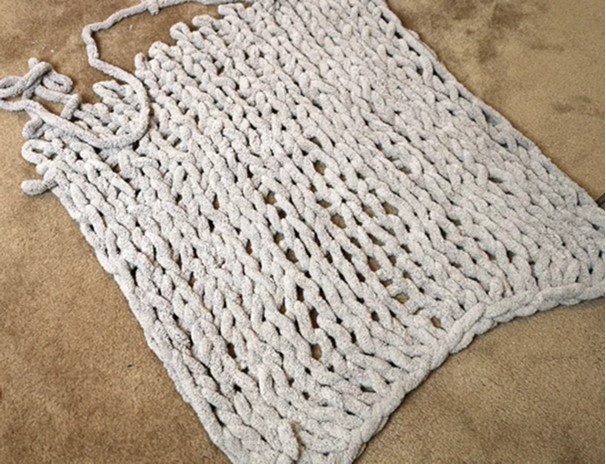
This is a perfect craft for those like me who have trouble with traditional crocheting or knitting. This project is to have a warm blanket at the end of your craft and pray your way through each hand stitch. Each loop done for this craft will be covered in precious prayers given to the Father of Heaven for peace, comfort, and love. This blanket can be for yourself or given as a gift to someone special who needs God’s comforting love.
Supplies:
(Supplies are for a larger-sized blanket.)
6-7 skeins of chenille chunky yarn
Supplies for a smaller lap-style blanket.
3- skeins of chenille chunky yarn
Scissors
Needle and thread (optional) – to reinforce areas where new skeins of yarn are joined.

Steps:
Step One: Start a slip knot.
To begin, you need to tie a slip knot to start your first chain, then pinch through the center of your slip knot to grab your working yarn and make another loop. You will repeat this process until you have 30 loops. If you want more information on how to tie a slip knot, there are many resources you can find online, repeat this process until you have started your first chain.

Step Two: When you have your first chain finished, start your first row. Be sure to point your working yarn in the direction you are working in; this help with keeping your work contained and easily

Step three: Starting with your first loop, pull another loop facing upwards, then go into the top of every single chain and pull a loop through, keeping all your sizes consistent.

Step Four: This first chain and loops can be a bit bunchy; keep flattening it out with your hands to prevent more twisting and turning.

Step Five: Make sure you have the same number of chain loops; for example, since I have 25 chains, I will have 25 loops.
Now it is time to start our second chain! Make sure to point the working yarn in the direction you are working in; start in the first loop, then pinch your fingers through the loop and pull the working yarn through, making another loop.

Final Steps: This is pretty much your entire process! These blankets take me about 2 hours to complete, so ensure you are comfortable. As someone with a bad back, you will want to ensure this step is not missed because you do not hurt your back by leaning too much. Trust me!
You will do all the following rows in the same way. There is just one important step to remember. Always skip the first stitch in each row. It doesn’t matter if the stitch direction is going left-to-right or right-to-left. If you are on a brand-new row, skip the first stitch and begin working in the 2nd loop. By doing this, you will be creating a beautifully braided effect along the edges.
For each stitch, you just put your hand through a loop, grab the working yarn and pull it into the loop to create another loop. These loops can be quite loose or tight. It is up to you. I recommend trying to keep the loops on the side tighter rather than looser. Mine came out a little looser than I expected, but next time I will choose to keep the knitting tighter. Otherwise, the braided edges will look messy or too loose.
Keep working row by row until you have the desired length. It takes very little time to create this blanket.
Extra tips learned during this process:
There are a few ways to attach or join with new yarn. You will use at least three or four skeins of yarn and will need to attach new yarn to the piece as you go along. For me personally, I did a lot of research and tried to learn from some experts in this field. I found two recommended methods.
The way I attached a new piece was very simple. When I got close to the end of my skein, I pulled out a new one, took its end, and tied it to the end of my working piece. I then tightened it as much as possible and trimmed the ends. Since I used chenille yarn, this was nearly unnoticeable when I was finished.
An alternative method you can use is needle and thread (choose a color like your chenille yarn) and create several stitches through that very knot. When we are putting this much love into a blanket such as this, we would never want it to come apart, especially if this prayer blanket were a gift. If that happens to you and you made your own blanket without the thread reinforcement, you should just be able to use some extra yarn (if it wasn’t tightly knitted) and re-knot it where the knot came out. It should work just fine.
The alternative method is beginning a new row with your new yarn and weaving the ends of your old yarn into the back side of the piece. This might be easier in the long run but also time-consuming; it is your choice.
I hope you enjoyed this process as much as I did. I am terrible at traditional knitting and crocheting, but this is one that I can see myself doing for many others as a precious handmade gift. As each loop and strand were knitted together, I prayed that whoever received this blanket be blessed with the love of Jesus, the comfort of the Holy Spirit, and the grace and acceptance that only God can give.
Download Printable Instructions:
 Meditation and Memorization of Scripture