By Major Beth Paugh
Intermountain Division

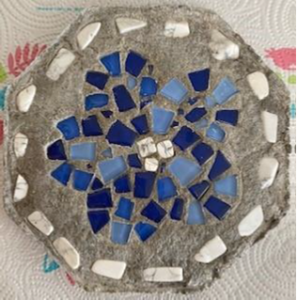
When I think of “Flourishing in the tests and trials season” two things came to mind, the first was a flower breaking through the winter snow. It fights so hard to get through the snow and to show off it beauty. The second thing is how God can take the brokenness that we experience through tests and trials and turn them into something beautiful. So why not combine the two and create something beautiful to remind us that God can create something beautiful through our trials.
Garden Mosaic Tiles are actually very easy and inexpensive to make. And the great thing is that no two are alike, just like us.
Supplies List:
- Stones or White Plaster Mix
- Shape or mold to hold plaster
- Something hard to set the mold on while it hardens
- Gloves
- Safety Glasses
- Hammer
- Large Ziplock Bag
- Popsicle Sticks
- Sponge
- Design pattern
- Pieces of tiles. Size will depend on the size of the shape or mold you use. You can also go to a Thrift Store and buy dishes to break into pieces. Thus, the need for the Ziplock bag and hammer.
Directions:
STEP 1: Decide what design you want to use with your tiles. It is helpful to draw out your design on a piece of paper. You will use this for two things. The first is to use this pattern to trace onto the plaster. The second it to help you lay out the tiles to figure out any pattern you wish to use. Make sure that your design is not bigger than the mold or shape you will be using.
STEP 2: Mix plaster per directions. It should have a batter type consistency, you don’t want it to be too runny. You will need enough plaster to fill the mold or shape.
STEP 3: Pour plaster into the mold or shape. Tap it gently on a surface. This helps to evenly spread out the plaster. Once it is level, set it aside to allow it time to begin to harden. Place on a hard surface that you
can easily move.
STEP 4: Trace your pattern into the plaster.
STEP 5: If using precut tiles, begin placing them around your paper pattern. This gives you a chance to play around with colors and shapes of tiles.
If using dishes from a Thrift Store, place them into the Ziplock bag and break into pieces with the hammer. Then when you have the desired sizes, begin placing them onto the paper pattern.
STEP 6: Continue arranging the pieces onto the paper pattern until you have a design you are happy with.
STEP 7: Begin transferring the tiles one at a time from the paper into the plaster. You can either use your finger to press them into the plaster or the popsicle stick. Continue until you have transferred all the tiles into the plaster.
STEP 8: Tap gently on a surface once again to make sure all the tiles are securely into the plaster. The plaster should come right up to the top edge of the tile to make sure they don’t fall out.
STEP 9: Set aside for approximately 24 hours to allow time to fully harden.
STEP 10: Using the sponge and warm water, wash off the tops of the tiles to remove any unwanted plaster.
Step 11: Remove from the shape or mold and enjoy!
Download printable instructions of this craft:
 March 2023 Devotional: Flourishing in the Tests and Trials Season