Submitted by Julee Schmidt
Del Oro Division
You will need:
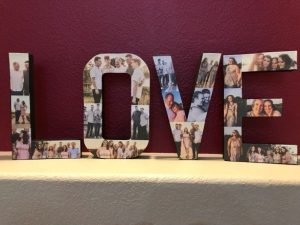
⦁ Paper mâché letters (I used 12 inch letters found at JoAnn’s)
⦁ Mod Podge
⦁ Craft paint (any color) + paintbrush
⦁ Matte clear sealant spray (poly urethane) optional
⦁ 4 x 6 – 5 x 7 photos (size will depend on the picture): Each letter used about 5 photos. Print extras so you have options.
⦁ Scissors, paper trimmer

The first step is to paint the sides and backs of the paper mâché letters. I used inexpensive acrylic craft paint. You could also use spray paint if you prefer. Allow paint to dry. After it dried, I decided to paint the front side of the letters to help blend the edge of my photos.

Next, lay out photos on top of each letter and determine which photos you want to go where. This took the most time, figuring out how to cut and fit all the pictures together, like a puzzle. For each individual letter, arrange all of the photos onto letter to ensure it looks how you want, before gluing any of the photos down.

Note: I used the letters as a guide to trace and then cut each picture to fit.

Paint a thin layer of Mod Podge over the letter where the picture is going to go.

Place the photo down on the Mod Podge and gently press it down. Keep a paper towel handy to wipe off any excess Mod Podge.
Repeat with more photos until your letter is completely covered. Keep your fingers clean as you work and try not to smear Mod Podge over the photos.

Finally, seal your photo collage letter with another layer of Mod Podge or matte clear sealant spray. If using Mod Podge, just brush a thin layer of Mod Podge over the entire surface. It will go on white and dry clear. However, it will show brushstrokes. If this bothers you, use the clear sealant spray instead.

Download a printable version of these instructions:
 Flourishing Story: In the Waiting